User Manual: IPTV set-top box IP-QAM
Content:
General Information
1.1 Overview
IP-to-QAM Box is a universal IPTV network access module. It operates as portable edge DVB-C modulator that retrieves DVB-over-Http type channels/programs from the streaming server of IPTV provider and translates them to the RF input of the TV Set or cable STB.
The device supports two control interfaces to provide user comfortable and convenient Live and On-Demand TV preview experience.
First, IR reciever, allows simple switching of TV channels of IPTV provider play list. It is most convenient if TV Set RCU is used providing One Remote Control experience.
Second, Second Screen, let the user to employ the mobile device for easy and comfortable discovery of TV programs, launching Live or On-demand streaming, getting program description or any other associated information from the provider site or Internet at the time a selected program is shown at the screen of the selected TV Set.
Multiscreen is an other useful and convenient innovation. You can easily launch the program preview on the screen of any (all) TV Set (sets) in your home, pause the preview on one TV and resume on an other or use mobile screen to continue.
High security access module can be activated if IPTV operator decides to restrict illegal preview of TV programs.
The device Software can be automatically updated from the IPTV provider or manufacturer web site.
Embedded scripting language makes it possible to use open API to extend the device adaptability in the operator network.
IP-QAM is packed in compact size plastic case and used power supply of USB port of the cable STB or TV Set.
Embedded WEB interface can be used to make Individual settings such as network configuration, service provider URL or RCU adaptation.
1.2 Package contents
- IP-QAM Box
- 1
- Power cord of USB - micro USB type
- 1
- Passport
- 1
- User Manual
- 1*
* Optionally. Customer agreed.
1.3 Technical specifications
Network Interface
- Connector type
- RJ45
- Physical Interface
- 100Мbit Ethernet
- Network protocol
- TCP/IP
- Streaming type
- DVB-over-Http
- Network Identification
- Static IP, DHCP
- DNS
- Yes
Modulator
- Connector type
- IEC 61169-2, type 9,52 (Belling-Lee)
- Modulation
- DVB-C
- Specification
- EN 300429
- Frequency, kHz
- EN 300429
- Modulation type
- QAM64
- Symbol rate, Msps
- 6750
- PCR accuracy
- 500ns
Access control
- Embedded secure access module
- Yes
Individual setting up
- Interface
- Http server (Web interface)
Default settings
- IP address
- 192.168.0.100
- Login
- admin
- Password
- admin
Power supply
- Connector type
- Micro USB
- Supply Voltage
- 5V
- Max. Supply current
- 0.5A
Safety guidelines
2.1 General safety guidelines
- Always use caution and common sense.
- It is forbidden to use the device with undocumented power supply
- Connect and disconnect cables gently to prevent connector destruction.
- Repairs should only be carried out by a qualified technician.
2.2 Device Safe Operation Guidelines
- Only use specified supply voltage and signal type.
- Turn the device power off every time connections made.
- Escape to use unspecified cables.
- Do not apply it under heavy environmental conditions.
- Do not obstruct ventilation holes
Installation and setup
3.1 Physical Description
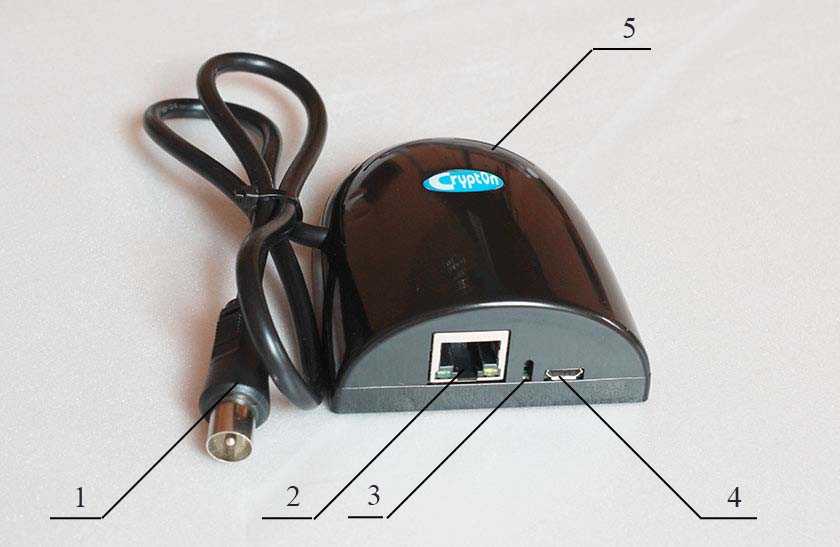
Physical overview
- Coaxial cable for connection to DVB-C input of TV Set or cable STB
- RJ45 for Ethernet connection
- Button to reset the device into factory settings
- Micro USB to power IP-QAM from TV Set USB port
- IR receiver for remote control with RCU
3.2 Installation
Unpack the device and check that all components are safe. If the device was taken to the installation room from a colder place wait at least one hour until condensed damp is dry.
- Place the device into constant location. We advise to use hanging hole on the bottom so that connectors are directed down. IP-QAM must be directly seen if you want to use Remote Control Unit (RCU) for the TV channel selection
- Connect the device to the Ethernet switch with "patch-cord"
- IP-QAM RF cable should be connected to antenna input of digital cable STB or TV Set
- USB – micro USB cable is used to power the device from USB port
- Turn the TV Set or STB power on
- Enter the device embedded Web interface and make IP-QAM proper setting up
3.3 Hardware setup
Default network settings:
- IP address type
- Static
- MAC address
- 00:01:15:00:XX:XX*
- IP address
- 192.168.0.100
- Subnet mask
- 255.255.255.0
- Gateway
- 0.0.0.0
- DNS
- 0.0.0.0
- Login
- admin
- Password
- admin
* XX:XX – the device series number Note. Please see your device MAC address information attached to the accompanying documentation.
Reset to the factory settings
During the device operation press the reset button on the connector side and hold at least 3 seconds. Turn the device power Off/On for new factory settings take effect.
Setting up user network configuration
- Enter IP address properly to agree your current network configuration. Make sure IP and MAC addresses of the devices of the same subnet are different.
- Set subnet mask properly (255.255.255.0 for LAN).
- Your Internet provider Gateway IP address is used for Internet connection.
- Login and password must be set to secure IP-QAM embedded WEB interface.
WEB interface requirements
The WEB server installed on the device supports a limited number of connections. In this regard, it is undesirable to connect to the device simultaneously from several computers. Also, simultaneous control of the device by several users can lead to malfunctions.
Minimum versions of supported browsers:
- Google Chrome 29
- Firefox 28
- Opera 15
- Internet Explorer 8
IP-QAM configuration over WEB interface
4.1 Logging in to the WEB interface
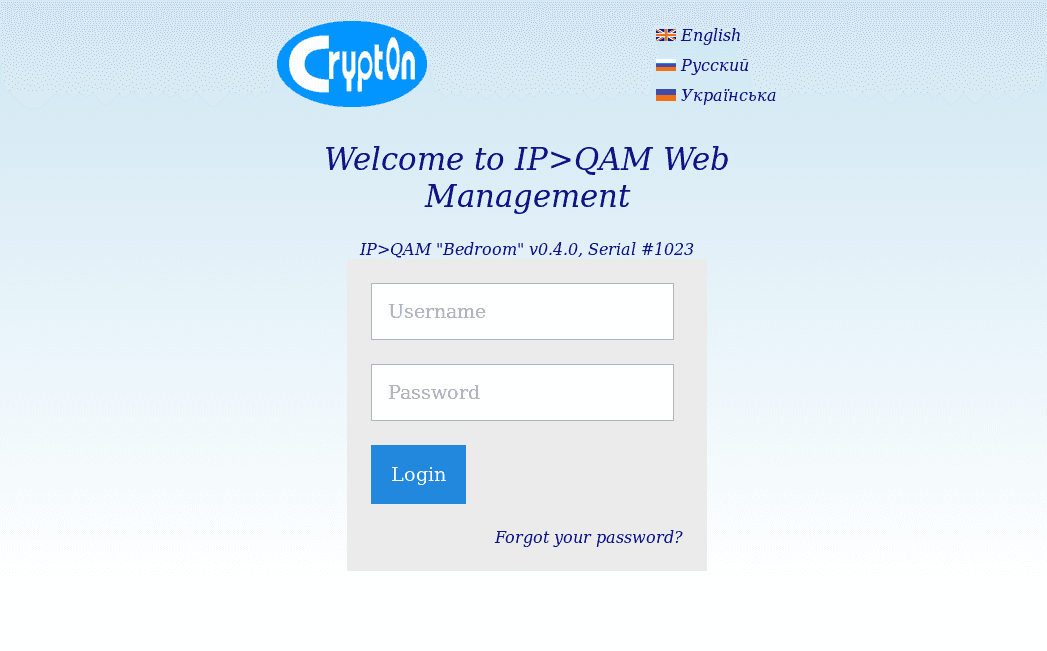
To work with the device, you need to enter the IP address in the address bar of the browser and connect to the device. After that, the authorization page will open, in which you need to enter your username and password.
Default Login — admin.
Default password — admin.
You can change login and password anytime if you enter the device configuration page.
After 15 minutes of the interface inactivity authorization period expires so new authorization process is required.
4.2 IP-QAM configuration
Configuration page looks as below:
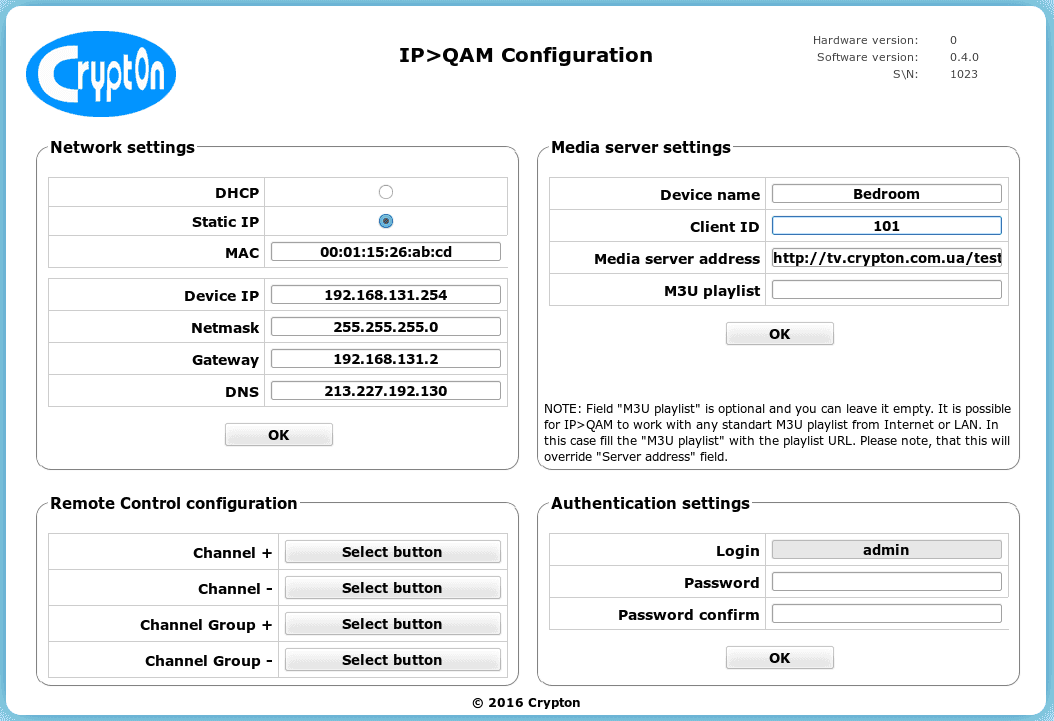
- Network settings section is used to configure IP-QAM for proper interfacing within your Ethernet LAN and Internet connection.
Media settings is used for IP-QAM or Second Screen unique identification within your LAN, and to point base Media server URL and additional playlist URL:
- Device Name let you descover IP-QAM modules within your LAN. It's convenient if the name say the location (Living Room, Bedroom etc.) but may be any.
- Client ID is used if your media server supports personal services ( playlist, advertising etc.) to present IP-QAM to the server.
- Media server lets IP-QAM to know the URL of the media server to work with. By befault Crypton media server is appointed. If no server can be found on the URL please make sure at least additional playlist URL is valid to let the device operate.
- M3U Playlist is used if You want to access an other IPTV network to request streaming TV channels. If additional playlist URL is present then IP-QAM will use it in RCU control mode. "Crypton IP-QAM" Android Second Screen application let You select any of two available networks to interoperate with.
Remote Control configuration lets you teach IP-QAM to understand RCU commands. It's convenient if You can use TV Set original RCU. To do so any four RCU buttons that do not affect TV Set must be selected to ascape interference.
- Channel + / Channel - buttons let You switch IPTV channels along the provider play list.
- If your provider has channels sorted by thematic groups (Music, Cinema, etc.), Ch. Group + / Ch. Group - let You switch these groups.
Note: All four buttons must be taught to apply new configuration. Four times press the selected button to see it become green. That means IP-QAM has undestood the RCU command.
- Use Authentication configuration if IP-QAM Web interface access parameters have to be changed.
IP-QAM control with RCU
After power on IP-QAM starts autonomous operation. It uses Media server URL preliminary configured over Web to upload network script and operator playlist. First TV channel from the play list is selected for play out.
You can use RCU buttons to switch groups of interest or TV channels in the selected group.
TV Set tuning to the IPTV broadcast
It's very important to perform proper TV set tuning to enjoy all IP-QAM Box diverse and agile features. The device uses 62000kHz DVB-C carrier to broadcast selected from the playlist IPTV channels. Usually the TV Set tuning routine requires steps as below:
- Broadcast type
- DVB-C
- Frequency
- 62 000kHz
- Modulation mode
- QAM64
- Symbol rate
- 6750 Msps
Start channel Scan. After successful search the channel preliminary selected for preview is seen.
Note: Please refer TV Set user manual for detail information on channel tuning process. We also advise You to clear list of scanned TV channels before each scanning to simplify usage of IPTV services.
IP-QAM control over Second Screen application
IP-QAM Box supports IPTV preview control over "Crypton IP-QAM" Android Second Screen application. It's very convenient to use mobile for TV Set preview control. Second Screen give You new nice experience of interoperation your connected TVs and mobile devices within your home net. Let You easy Catch-up TV programs discovery, launch and rewind. Pause the preview in one room and resume on the other room TV Set or mobile screen. Friendly and agile user interface let you enjoy real multiscreen, multiroom and interactive TV experience.
You need to start by installing the "Crypton IP>QAM" application from Google Play on your Android gadget. We will provide you with access to it when you buy a set-top box or upon request.
IP-QAM Box and TV set (STB) must be preliminary configured for IPTV reception before You start using Second Screen.
Every time You start application it provides IP-QAM device seaching and lets you select one for preview.

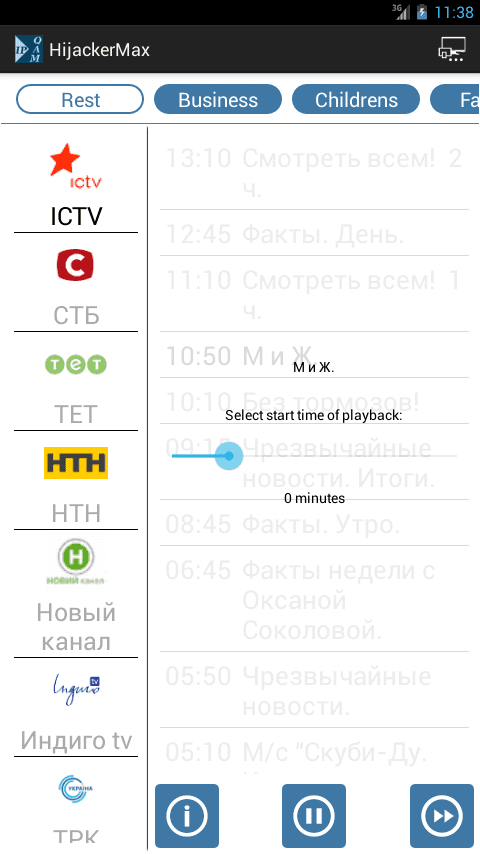
Next window shows You All TV channels sorted by interests and On-demand programs arranged by time. Standard Android tools let You easily navigate resources of Your IPTV provider.
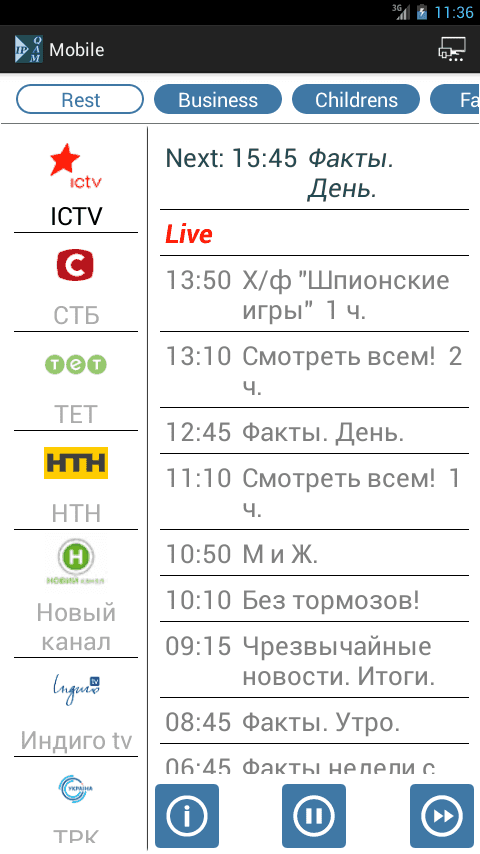
If On-demand mode is available for the selected channel You can select the TV program (event) start preview from any time, rewind and pause if required.
Multiscreen (Multiroom) is another great feature available with IP-QAM Box. It let You pause preview on one TV screen and resume on an other (in other room) or on the screen of your gadget to continue.
© 2023 Crypton Ltd. All rights reserved
